Slow motion is a simple effect and great technique to apply to your footage, especially for capturing fast motion and high speed subjects and objects. In this post I will break down a step by step process on how you can create your own smooth slow motion sequences.

SETTING UP YOUR CAMERA
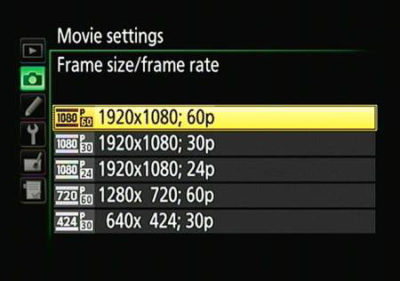
Slow motion can be filmed using smart phones, digital cameras, DSLRs and other cameras on the market. The secret to capturing smooth slow motion is all in the frame rate. The human brain can’t distinguish anything higher than 30 frames per seconds. For those that don’t know, video is actually just a ton of still photos captured of a given sequence. Frame rate is the amount of still images captured in a 1 second time frame. Any frame rate higher than 30 allows you to transform your footage into slow motion. The higher the frame rate, the slower you can make your footage. Conventional slow motion can be generated from footage captured with a frame rate of 60 frames per second. Super slow motion can be generated from higher end cameras at frames rates in the 120 frames per second range.
With this information in mind, you can set up your camera. If you’re using a smartphone there is typically a “slow motion” setting you can select and your camera will automatically film using a high frame rate and convert it automatically. If you’re using a digital camera or DSLR you will need to select a high frame rate capture your sequence and import your footage into an editing program to slow it down.
One other general rule to follow when shooting at higher frame rates is to set your shutter speed to at least double your frame rate. So if you’re shooting at 60 frames per second, your shutter speed should be 120 (1/120th of a second).

SLOWING DOWN YOUR FOOTAGE USING EDITING SOFTWARE
- iMovie: If you are using iMovie you can easily slow down your footage. If you don’t know how to use iMovie you can watch the detailed tutorial section on how to edit videos using iMovie. Once you have your footage imported and in your timeline, highlight your clip and then click speed icon in the top right corner above your movie preview window. Then click the “slow” option which will bring up additional options allowing you to select the percentage speed you would like to make your footage. You can also go back to your clip in your timeline and use the controller to shorten or stretch your footage with to make your footage faster or shorter respectively.
- Adobe Premiere Pro: If you are using Adobe Premiere Pro you will follow a slightly different sequence to convert your footage into slow motion. First import your footage into your project and select the clip you want to slow down in your timeline. It is important to make sure your sequence is set to a frame rate lower than your slow motion clip. Premiere automatically sets the sequence to the clips specifications if it’s the first clip dragged into a sequence. You can slow your footage down in a few different ways. The first method is to simple right click on your clip and select “speed/ duration.” Change the percentage to how slow you would like to make your clip (50% will slow your clip down by half). The second method is to find your clip in the project window and right click on it. Hover over “modify” and select “interpret footage.” Select the “Assume frame rate is” option and select the frame rate of your sequence. The whole clip will now be in slow motion and you can drag it into your sequence. The third method allows you to modify the speed of the clip in varying ways as it plays in your timeline. Once your clip is in your timeline right click on the yellow “fx” button located on the right end of the clip. Hover over “time remapping” and select “speed.” Once you do this you will notice a line visible in the video layer of the clip. Drag this line down to slow down the footage. You can also press “p” on your keyboard and click along the line to make adjustments at varying points in your timeline.